
Pipecat


pipecat is a framework for building voice (and multimodal) conversational agents. Things like personal coaches, meeting assistants, story-telling toys for kids, customer support bots, and snarky social companions.
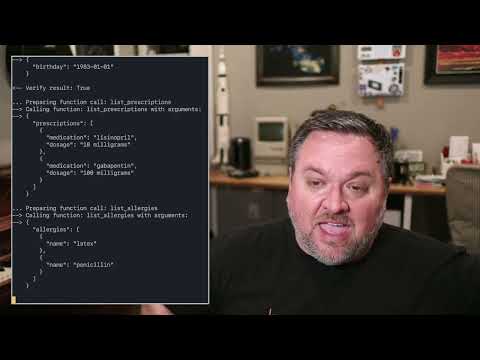
Build things like this:
Getting started with voice agents
You can get started with Pipecat running on your local machine, then move your agent processes to the cloud when you’re ready. You can also add a telephone number, image output, video input, use different LLMs, and more.
# install the module
pip install pipecat-ai

# set up an .env file with API keys
cp dot-env.template .env
By default, in order to minimize dependencies, only the basic framework functionality is available. Some third-party AI services require additional dependencies that you can install with:
pip install "pipecat-ai[option,...]"
Your project may or may not need these, so they're made available as optional requirements. Here is a list:
- AI services:
anthropic,azure,fal,moondream,openai,playht,silero,whisper - Transports:
local,websocket,daily,
Code examples
There are two directories of examples:
- foundational — examples that build on each other, introducing one or two concepts at a time
- example apps — complete applications that you can use as starting points for development
Before running the examples you need to install the dependencies (which will install all the dependencies to run all of the examples):
pip install -r requirements.txt
A simple voice agent running locally
If you’re doing AI-related stuff, you probably have an OpenAI API key.
To generate voice output, one service that’s easy to get started with is ElevenLabs. If you don’t already have an ElevenLabs developer account, you can sign up for one [here].
So let’s run a really simple agent that’s just a GPT-4 prompt, wired up to voice input and speaker output.
TBC
Run it with:
TBC
Example projects
We've created a seperate repo here that have fully featured example projects to help you get started.
git@github.com:pipecat-ai/pipecat-examples.git
WebSockets instead of pipes
To run your agent in the cloud, you can switch the Pipecat transport layer to use a WebSocket instead of Unix pipes.
TBC
WebRTC for production use
WebSockets are fine for server-to-server communication or for initial development. But for production use, you’ll need client-server audio to use a protocol designed for real-time media transport. (For an explanation of the difference between WebSockets and WebRTC, see [this post.])
One way to get up and running quickly with WebRTC is to sign up for a Daily developer account. Daily gives you SDKs and global infrastructure for audio (and video) routing. Every account gets 10,000 audio/video/transcription minutes free each month.
Sign up here and create a room in the developer Dashboard. Then run the examples, this time connecting via WebRTC instead of a WebSocket.
Hacking on the framework itself
Note that you may need to set up a virtual environment before following the instructions below. For instance, you might need to run the following from the root of the repo:
python3 -m venv venv
source venv/bin/activate
From the root of this repo, run the following:
pip install -r dev-requirements.txt -r {env}-requirements.txt
python -m build
This builds the package. To use the package locally (eg to run sample files), run
pip install --editable .
If you want to use this package from another directory, you can run:
pip install path_to_this_repo
Running tests
From the root directory, run:
pytest --doctest-modules --ignore-glob="*to_be_updated*" src tests
Setting up your editor
This project uses strict PEP 8 formatting.
Emacs
You can use use-package to install py-autopep8 package and configure autopep8 arguments:
(use-package py-autopep8
  :ensure t
  :defer t
  :hook ((python-mode . py-autopep8-mode))
  :config
  (setq py-autopep8-options '("-a" "-a", "--max-line-length=100")))
autopep8 was installed in the venv environment described before, so you should be able to use pyvenv-auto to automatically load that environment inside Emacs.
(use-package pyvenv-auto
  :ensure t
  :defer t
  :hook ((python-mode . pyvenv-auto-run)))
Visual Studio Code
Install the
autopep8 extension. Then edit the user settings (Ctrl-Shift-P Open User Settings (JSON)) and set it as the default Python formatter, enable formatting on save and configure autopep8 arguments:
"[python]": {
    "editor.defaultFormatter": "ms-python.autopep8",
    "editor.formatOnSave": true
},
"autopep8.args": [
    "-a",
    "-a",
    "--max-line-length=100"
],